Part Three Materials
Reflection on feedback from tutor
Having completed Assignment 2 I received feedback from my tutor Lizzy Levy. I was pleased that my tutor has seen that ‘a strong development has been shown within research where you are interpreting artists’ works well with personal opinion alongside very relevant facts’. My tutor did advise that I had gone off the brief when I had taken risks as ‘there is a method within this brief to encourage playful experimentation rather than a narrative’ and so on this next assignment I will try and work to what the brief asks. I think I am perhaps taking too many photographs of my work but I had wanted to chart my progress. My tutor advised that ‘Taking elements of a kitchen appliance rather than the whole may have also led to innovative pattern and collage making”, something which I had not always done but now will take this on board and try and work from this perspective. I did agree with my tutor that I need to spend more time on my images and to crop and make them neater.
My tutor agreed that my reflection of a couple of my collages that “sometimes less is more” as the stacked bowl collage was too busy and should have been less complicated. I certainly understood more from my tutor’s feedback about ‘Consider working in series, such as making one and then extending this in differing ways to really stretch the parameters of an idea before moving on – think of a series of 3 to 5 versions. This will also promote your work having more cohesion such as a ‘collection’.’
I did feel that this made more sense as I think I was trying to make as many ideas as possible to fit the brief when this was not as necessary. I also need to consider using a colour palette. I had been using my sketchbook for development of ideas and my tutor suggested that I ‘explore building mini collage works within sketchbook pages to investigate composition and colour palette’. My tutor also encouraged me to continue with my research into the practitioners of the art world and their place with that world and their methodologies to then respond with my own thoughts, reflections and interpretations and to use this to inform my own ways of working.
My tutor added links to websites for suggested reading and has chosen artists who I will be really interested in as I enjoy repurposing and finding new ways to do this. I can honestly say that I now view bits of used paper in a totally new way having done the collage assignment and that I am now adding to my existing stock for future use.
Exercise 3.1 Researching your theme
From the themes given in the course materials I chose ‘stacked and layered’ and my recent visit to Birmingham Museum and Art gallery had inspired my choice, in particular the beautiful mummy wrapped in layered bandages as well as a patchwork housecoat I also saw there.


Both examples gave me a better idea of how material can be manipulated into shapes and textures, repurposed and consciously used to make a diversity of imagery as well as an item of beauty. With this in mind I was keen to find out more about material manipulation and started my research on artists to further develop some of my themes.
Hsiao-Chi Tsai
I researched several artists to prepare for this assignment and began with Hsiao-Chi Tsai as I have a book entitled “Textile Designers at the Cutting Edge” by Bradley Quinn (p. 206-215, Laurence King Publishing Ltd, 2009). Tsai had studied textile design at the Royal College of Art in London and likes to work in large scale installations, having collaborated with a sculptor named Kimiya Yoshikawa who gave her knowledge of three-dimensional construction. This produced a set of sculptures called “Futuristic Flowers”. Tsai works with a wide range of media and in particular lycra, felt and polyester as well as foam, plastic, sheet metal and ceramics.


(left to right “Art Deco Collection” and “Futuristic Flowers”)
(source: http://www.tsai-yoshikawa.com/hsiao-chi_tsai/portfolio/)

“Walking on the Lake” (source: http://www.tsai-yoshikawa.com/hsiao-chi_tsai/portfolio/walking_on_the_lake).
I have always admired the work of artists who design three-dimensional art on a large scale as it interests me on how the pieces are put together and also how they stay in place, when I have visited art galleries and seen installations they convey so much from so many different angles, especially when combined with differing types of light.
Laura Moriarty
I happened on Laura Moriarty by chance when I was looking for Lauren Moriarty, I was really intrigued by her work and the collection entitled “Underworld”, the layers and colours used reminded me of volcanic rock layers and coral and flowed and ebbed just like live coral. Laura Moriarty used molten beeswax to produce her work and also ‘makes process-driven sculptural paintings and works on paper whose forms, colors, textures and patterns result from the same processes that shape and reshape the earth: heating and cooling, erosion, subduction, friction, enfolding, weathering, slippage.’
I enjoyed looking at the photos of Moriarty’s work and found the colours, folds and layering so inspirational. I would like to make a similar piece in felt and with beading so will add these concepts to my imagery file.
(Source: https://www.lauramoriarty.com/sculptural-paintings/)


Machiko Agano
Machiko Agano is an Japanese artist specialising in master weaving artist and is known for her elaborately woven structures usually created to be installed in a specific space. Most of Agano’s works use translucent or neutral coloured materials to portray fragile and delicate themes. When I was researching for this part of the course it made me realise that I wanted to use colour for my fabric samples to give the creations more interest and depth.
I particularly liked the rippled piece below, it did remind me a little of the wired ribbon used in floral displays but I found it interesting and compelling to look at due to its complexity and size. To create each little circlet of fabric and twist each piece must have taken both extreme skill and patience.


The above piece was beautiful to look at as it is so fragile and delicate and also seemed to be almost antique. I have always found aged material fascinating, hence my large collection of vintage lace. Some of the lace is from the 1920s and 1930s and I like the imperfect nature of the older lace. I can imagine how imposing a large installation of this weaving by Agano would look and I would have liked to have seen how it looks in colour.
(source: https://trendland.com/machiko-agano-textural-installations/)
Exercise 3.2 Sample ranges
Stage 1 Material tests
From the given list of materials I chose plastic and calico to develop as a sample range, I wanted to try two very different types of material and also as I had never experimented with plastic before and it sounded interesting. I had collected a good quantity of cellophane wrappers from chocolates at Christmas and also plastic bags and based my sample range on thinner plastics such as these as I thought they would be easier to work with.
I decided to begin with applying heat to the plastic pieces to see how they would react. I boiled a piece of a white thicker plastic bag in hot water but this made it floppy but did not change it in any way so I then held more pieces of plastic bag over the gas burner and I was interested as they curled up and scrunched closely, I then sewed them together in layers and the end result was a robust form which could have potential in a larger scale if also a mix of colours was used.


I then took a paint stripper heat gun and arranged the pieces of coloured cellophane and stuck them down with Sellotape and after applying heat, I liked how the cellophane changed shape and size to great effect in stacks and layers and how it became three dimensional, also that the Sellotape melted into strings and held it together. I wondered again how this could work on a much larger scale to perhaps depict a theme such as a portrayal of reducing waste and the effects of single use products. I tried mixing cellophane with blue plastic dress netting and again used the heat gun. The result was intriguing from a textural point of view as some of the netting melted into holes to reduce and take away and I imagined how this could look as a mixed installation but I did not feel it was as interesting as the first experiment.


Choosing calico as a background, I stapled cellophane pieces to it to layer and stack it and again used the heat gun. I saw the cellophane pieces reduce and change shape and liked how heat changed the colour, producing an almost tie dye effect. 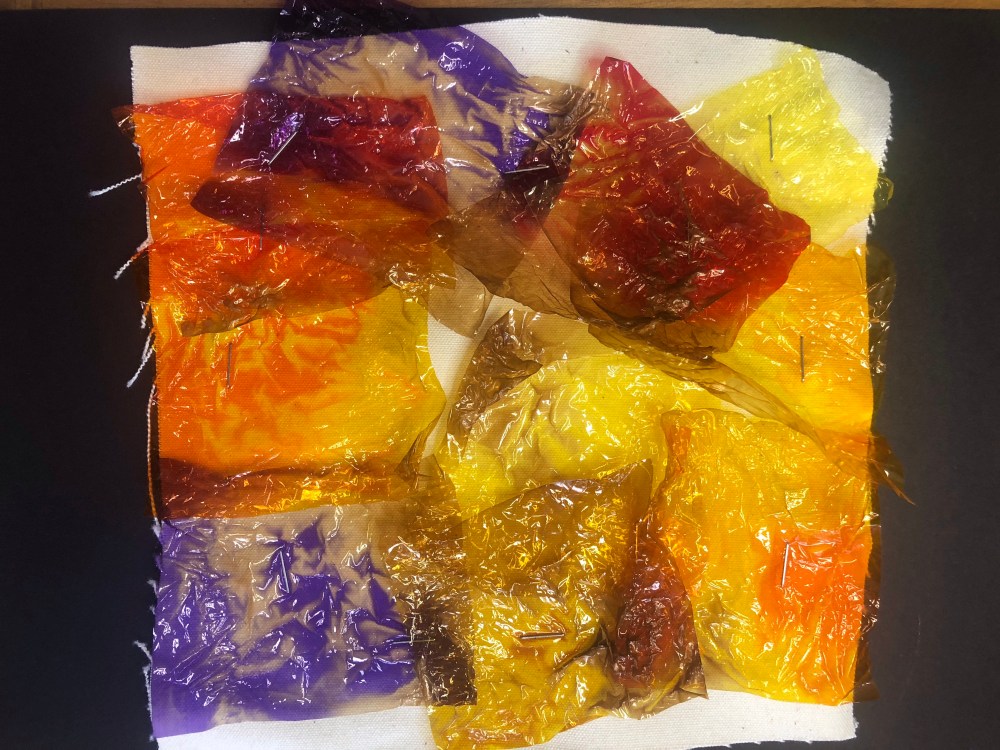
Using the thicker plastic bag I tried ripping and tearing it as well as perforating it, it did not seem very interesting apart from when I used my fingernails to stretch the plastic which made little peaks and I liked how this made layers from flat plastic.


I wanted to look at interlace and interlock next and so tried weaving strips of plastic bag in the way that a friendship bracelet is made, I did not feel with worked very well so then made yarn out of long strips of black plastic bags and knitted with it. This gave a far more pleasing result and I particularly found it surprising as the knitted square was very strong. I would have liked to have tried this on far bigger needles and large sections as folded over into a tube gave many more possibilities into how this could be used as a construction.


I rolled plastic again and created a coil effect when sewn onto paper and again I could see that this could be taken further and might be able to be sewn into a coil pot. I tried cutting plastic insulation fabric into strips which gave a delicate fringed effect but I did not think this was worth further development. Machine sewing was difficult due to the plastic being thin and tearing easily but using the red thread gave a focal point and I think I may try this idea in the future.


I moved on to testing calico and wanted to create a colour palette rather than just use the fabric in its plain state as a mix of colours would create a more defined look layered or stacked and would make it easier to look at. I made natural dyes from rusty nails in a jar of salty water, nettles, avocado skins, beetroot, spinach, orange peel, white onion and red onion skins. I noticed that the orange peel, spinach and nettle dyes were far more sublime and so decided to use the bolder colours, especially as I wanted to have an overall theme of aged and distressed fabric.


I began by perforating the fabric and also using heat to see how this could work. Applying heat with the paint stripper gun made the calico shrink and bubble a little in shape and burning the fabric did not interest me enough to consider working further using heat. I used a lighter weight calico for the perforation and liked the idea as it distressed it a little but I wanted a more dramatic result.
Knotting and coiling thin strips of calico was unusual as was interlocking but again I did not think it was enough for me to want to explore further at present.


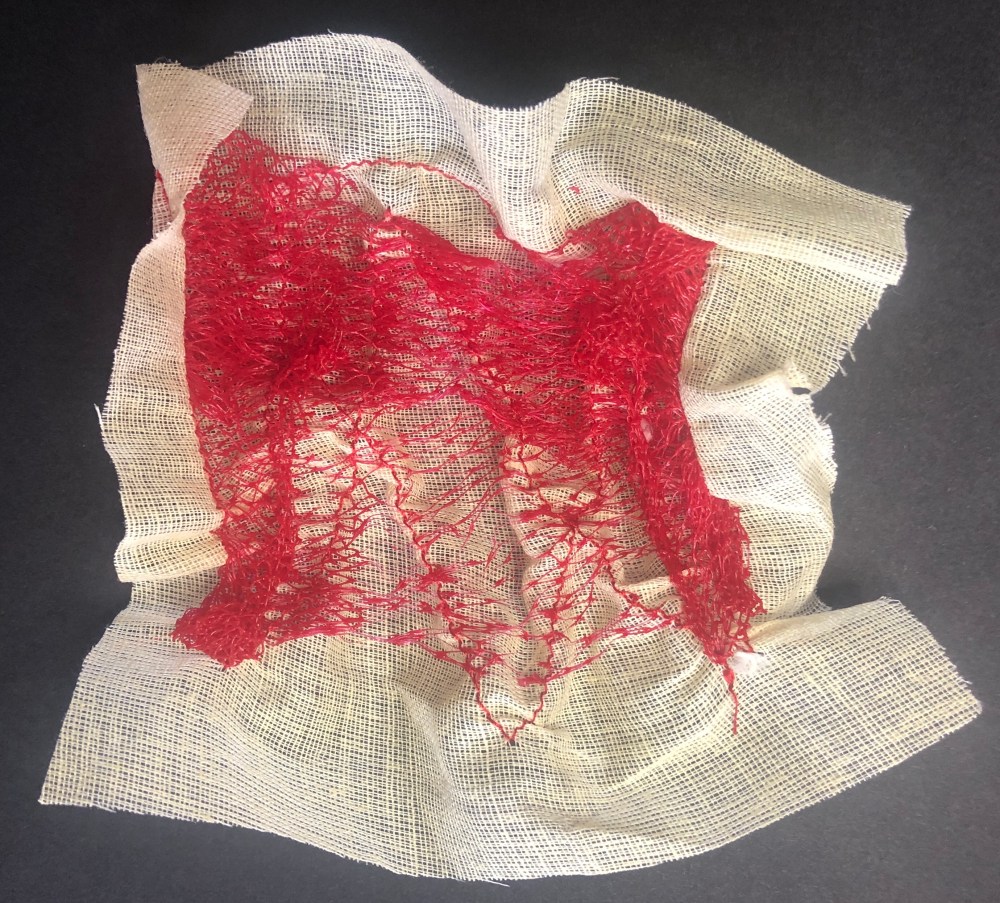
Slashing and tearing the calico did interest me and I felt I had successful results with this as I liked how it complemented the use of the range of colours I had. I tried stuffing a torn piece of fabric with lots of threads to make it puff out a little and it reminded me a of a barnacle. I also tried visible mending and sewed lines in a Sashiko theme which is a Japanese method of stitching which translates to “little stabs” and was used primarily to reinforce or repair worn sections of cloth, which then developed as a decorative stitch. Sashiko is often used with red thread, so I sewed with red thread also to bring a historical element to the samples. I felt these worked very well and I wanted to develop this further. I also sewed a net type effect on one sample to pull the slash detail back together.


I pleated and layered more calico and liked how the colours interacted when doing this and I wanted to look at this in more depth in the next few samples. I then tried machine sewing to try and gather the calico into pleats but this did not give the desired effect. I returned to the list of techniques and tried interlocking by weaving torn strips of fabric with cut plain fabric and it gave a nice checkerboard style.


I wanted to try some more three dimensional experiments and so made calico into thin pencil-like rolls and sewed them with visible mending onto a plain background of heavyweight calico, I really enjoyed this and so then stitched by hand stripes of fabric which I then sewed into to make a honeycomb type structure. This made me realise more that fabric does not have to be flat and I could see that this over a much larger scale could be very dramatic. With this in mind, I cut strips of heavyweight calico into strips and stapled them on a background piece with a stapler, it really gave a thick ruffled effect and I was surprised at how efficient and pleasing this was as it looked very vintage.


I wanted to look further into layering and so took heavily dyed calico to try out a few ideas. I arranged pieces of different coloured material into a stack and sewed them together into a bundle and was very pleased with the ragged appearance. I liked precise sewing for some of the items I make for my home and to sell but this was a chance to really experiment into some of the textile art I have admired on Pinterest.


The flat layered add/take away test piece looked very fragile due to the colouring and I decided that I wanted to carry these examples into further sample development.
I made a final sample using additional materials and items. I used the paint stripper heat gun again and melted a plastic fruit net onto calico to see what it would do. I found it fascinating as the net reduced in size, fused and pulled the calico closer together in a similar fashion to smocking.
Stage 2 Sample development
I chose the theme of ‘stacked and layered’ for the main basis of my sample development as I enjoy working with textures as well as sewn effects and I decided to use calico in mixed weights giving more variety and ability to produce structured layers. I made a few sketches in my sketchbook for ideas for both calico and cheesecloth.


I began by cutting a piece of calico of the size needed and put covered dress buttons underneath and held them in place while I knotted thread around it from above. I repeated this over and over again and saw the fabric shrink, pleat and layer and the upper surface looked almost alien in pattern.


It was very interesting to see how the technique shrank the fabric and I liked the feeling of holding the piece as it reminded me of stacking pebbles from when I had visited Cornwall a few summers ago. I was delighted with this result and wanted to develop this further as it had ongoing potential.

I chose a much bigger piece of calico and used flat buttons of varying sizes and again tied them using thin string. I liked the look of the stacks and thought I could develop this further by stacking the actual buttons.


To follow this I repeated the button stacking and liked the way this gave the fabric more height as well as layers. The buttons have been successful in terms of the stripes and spots requirement in the course materials.


I wanted to try free motion embroidery and cut circles from heavyweight calico and layered them on a backing piece. I sewed onto some circles prior to attaching them onto the backing piece and left some not fully sewn down to give interest. I used a colour palette to give more definition as calico is such a neutral colour. What I did find from this sample was that both sides of the fabric worked well. My sewing machine is quite a basic model and was not too keen on the free motion sewing but I have another machine that I may set up to see if I can do more drawing with stitch.


My next samples were again spots and I cut out many different sized circles and layered them onto a backing piece then sewed a single line through the middle of each set. I wanted this to be tactile and lightweight to resemble petals. Having completed the first sample with plain calico, I tried again with many more circles of varying shades of colours from my homemade dyes. This time the sample worked far better as the fabric was crumpled and the colour and shapes reminded me of fragile autumn leaves.


I wanted to experiment with stripes and ripped thin strips of calico and layered them onto a heavyweight calico background before sewing them with my machine using red thread. I liked the simplicity of the stripes but wanted to reflect back to Collage and so constructed a herringbone layered piece using the hand dyed fabric to help pick out the sections. I thought this piece was very successful and liked the distressed look it gave.


I wanted to try and build a similar structure of the Egyptian mummy’s intricate bandaging which I viewed at the Birmingham Museum and Art Gallery, so tried a piece in plain calico and machine stitched close to the edges to try and give definition and accuracy. This worked well and gave a crisp angular finish.


I decided to try this again but with dyed heavyweight calico to see if I could make something almost three dimensional as this was the effect given by the mummy’s bandages. I sewed folded sections of calico and slowly built up into a pattern and leaving the inner edges unsewn so they looked almost padded. The finished piece was heavy and very defined which I really liked. I did not feel that this effect could be gained as well if torn strips of fabric were used as the placement needed to be very precise.


I wanted to look further into pleats and layering and so took heavily dyed calico to try out a few ideas. I folded pieces of different coloured material into a stack and sewed them together into a bundled and also layered colours of calico in size decreasing order for add/take away and I thought I it looked of great interest and also very distressed and old looking which was something I had wanted to convey.


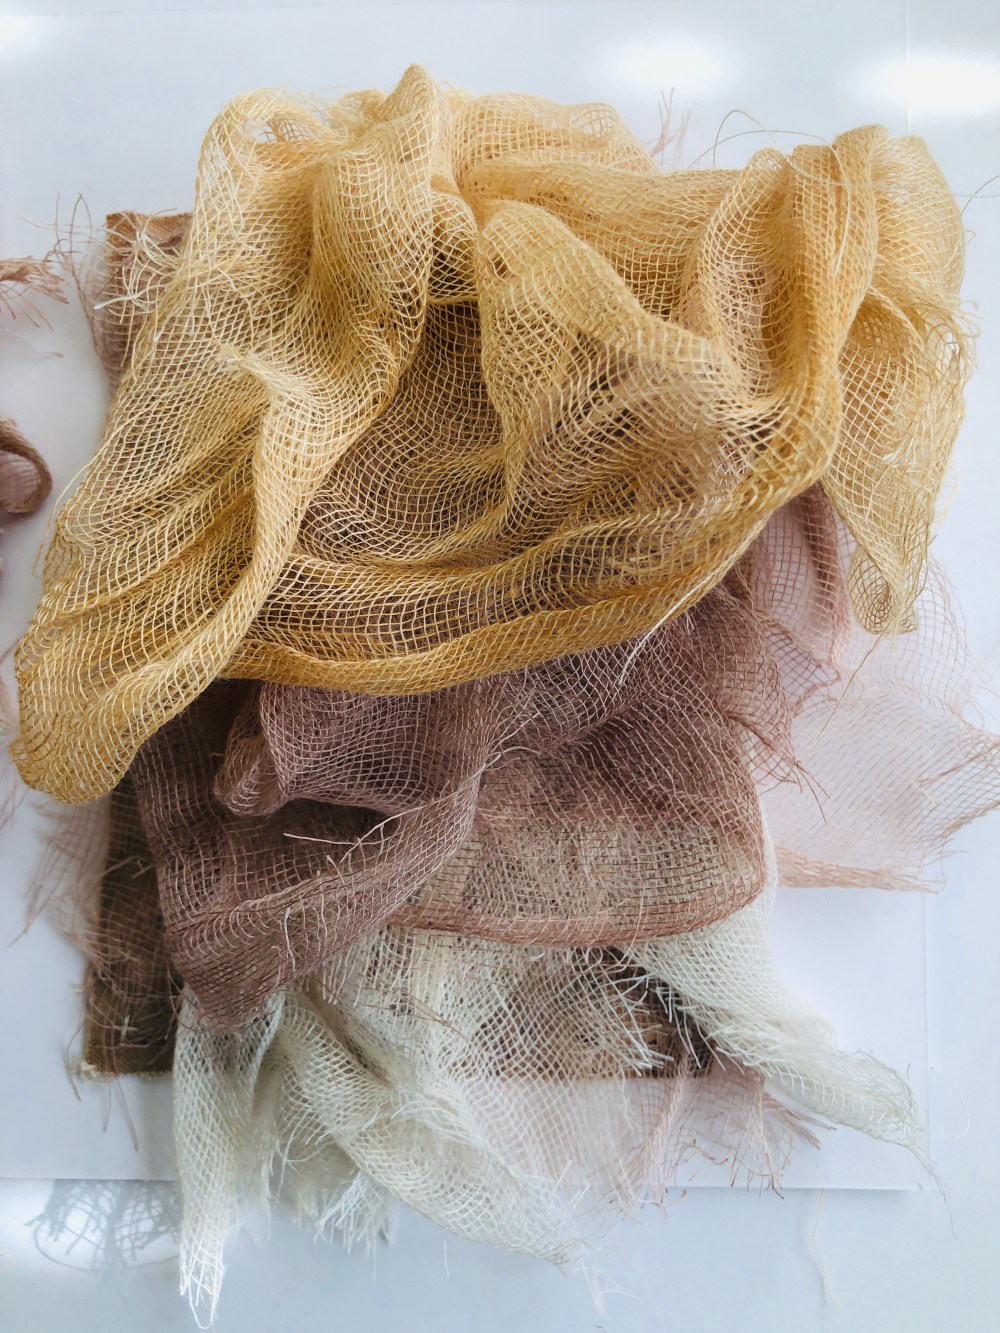
Having completed samples in calico I then moved onto a second set using cheesecloth which is a very fine net, often used in straining or removing the whey from cheese curds. I wanted to try this as a sample range as I did find plastic net difficult to work with and my sewing machine objects to any fabric that is very thin and delicate in nature. I found the course materials very difficult to interpret at this stage as they instructed to choose another material to develop a sample range. Having looked at other students blogs, I thought it better to adhere to this instruction rather than risk sending half an assignment.
I wanted to dye the fabric I was using and so I used the nettle dye, rust dye, avocado and red onion dye to give more interest and I liked how the cheesecloth was less absorbent to liquid which is possibly why it is so useful when used in food preparation. I also wanted to try and make three dimensional samples whenever possible.


As the cheesecloth is so fragile I realised that I needed to use items to help sculpt it and so I took pipe cleaners and rolled fragments of different coloured cheesecloth over them to form mouldable tubes. With the theme of stripes and spots I sewed the whole tubes to a backing of calico to hold them in place and made a set of four rings and then a series of curved stripes which went in opposite directions.


As I worked I could see that I was mixing ‘fragile and delicate’ into my overall theme as well as ‘stacked and layered’ but felt they worked well together. I wanted to continue with this idea of using the pipe cleaners and develop a series, so I tried weaving the cheesecloth to create a stack and it reminded me of deep sea creatures although I did not want to label it as a jellyfish!


I liked how the delicate fibres were the main focus on this sample and felt it was a success due to the lattice I had created, plus the colours suited the sample well.
I still had to try another theme as I had an idea about ‘bulbous and inflated’ and wanted to see how this could work in a similar way to what I had made using the buttons and calico and so I made soft balls of calico and tied cheesecloth around them. This again reminded me of coral and underwater creatures and so this became my favourite sample of the series. It is difficult to see in the photos but the bulbous tubes are not sewn flat to fabric so they have movement when looked at and held.


I carried this on with a second sample where I had sewn the cheesecloth balls onto the calico to give a flatter and more arranged effect but I did not like this as much, although the ruffled effect of the three dimensional spots was interesting and side by side I thought the overall look was good.


I looked at some of my research for Assignment 3 and decided to try stacked and layered as this could work better with cheesecloth than it did with calico as cheesecloth can gather much more easily as it is so much thinner. I hand sewed cheesecloth to give a ruffled effect and then tried again with gathered pieces as a trio mingled together. The second piece reminded me of underskirts beneath an old fashioned wedding dress from centuries ago that had gently stained as it aged.
For my final sample in the range I decided to mix calico and cheesecloth together and so I cut small slits in calico and added pieces of flat cheesecloth at the rear of the calico and then pushed buttons through it to give a spotted effect. The cheesecloth was very fragile under this kind of pressure and so the buttons did not hold in place very well but it interested me, however I preferred my other samples to this as this sample felt too simple.


Exercise 3.3 Presenting your work
Having presented my samples on white card, I tried to match them into similar themes and laid them out on a table to view them as a whole set. I had found that more fluid samples worked better with the cheesecloth and that the calico was good for defined and bold samples. The cheesecloth was excellent as a cover, such as the bulbous samples I produced but was too fine to use on its own as a three dimensional piece of great size.
I think I chose well with the two types of sample fabrics and also that I decided to move past the plastic test pieces as I think I would have exhausted concepts and ideas for this far more quickly.
Upon embarking upon Assignment 3, I thought it would be easier for me as I already sew and enjoy working with fabric however I found it very difficult. I don’t want to copy other people’s work and wished to come up with my own ideas but I almost felt that I genuinely had a mental block by the time I reached the end. I was disappointed by this but did enjoy working with the different fabrics and materials and finding that I was capable of making the three dimensional samples which I liked best of all. I think I am too used to working with set patterns and I found that I get more inspiration this way as to how to alter them or improve them. This however can lead to an approach that is perhaps too confined and less likely of achieving a really bold completed piece.
I think such samples could be used well within textiles for recycling fabric as I noticed straight away that once the calico was washed that it lost its stiffness and the waterproofing chemical and it had a new texture altogether. I believe this would be ideal for large scale art pieces or rugs and I think I had chosen the correct themes to match the fabrics I chose. The key things I would like to build on from this learning experience are to continue with material tests and to develop my liking for three dimensional work.
